디논실 Lab 8 정리
- 2 minsLab 8: UART 실습
SPI communication
- How device talk to each other?
Language: communication protocol 다행히 DIY(Do It Yourself!) electronics에는 크게 3가지 protocol 밖에 없다.
- Serial Peripheral(주변) Interface (SPI)
- Inter-Integrated Circuite (I2C)
- Universal Asynchronous Receiver/Transmitter (UART) 위 프로토콜들의 전송속도는 USB, ethernet, bluetooth보다도 느리다.. 하지만 매우 간단해서 적은 하드웨어 리소스를 사용한다는 장점이 있다.
- Serial vs Parallel
Parallel의 예시: what is DIY electronics
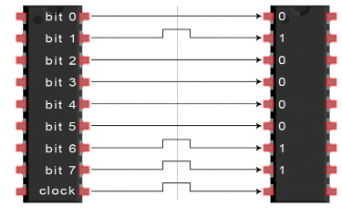
Seiral의 예시: Clock을 기준으로 데이터를 전송받는다.

SPI의 장점은 데이터 전송량에 제한이 없다는 것이다. With I2C, UART는 패킷단위로 데이터를 전송하기 때문에, Start and stop condition이 필요하다.
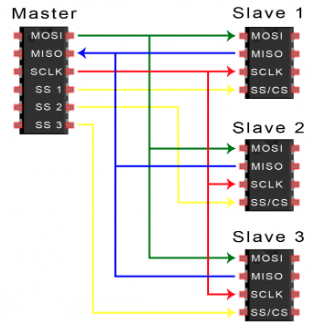
SPI는 master-slave relation 구조를 취한다. Master는 Instruction을 내리고, Slave가 수행한다. Master, slave의 기준은 여러 개가 가능하냐는 것이다. One master는 한개 이상의 Slave를 조작할 수 있다.
- Master-Slave 구조 MOSI (Master Output / Slave Input ): Master가 SLave로 보내는 line MISO (Master Input / Slave Output ): Slave가 Master로 보내는 line SCLK (Clock): line for clokc signal SS/CS (Slave Selection) : Line for the master select which slave to send data to
SPI는 Clock signal을 사용하므로 synchronous communication protocol이다. Asynchronous protocol의 경우 clock signal을 사용하지 않는다.
Multiplie slaves는 어떻게 접근할까?
Single pin으로도 multiple slave 구조를 취할 수 있다. 이를 daisy-chained like structure
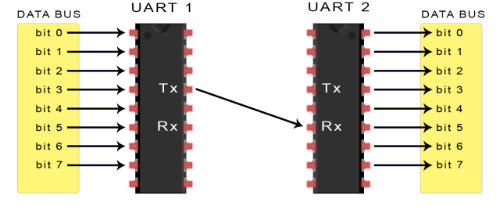
UART ( Universal Asynchronous Receiver-Transfmitter)
UART는 통신 프로토콜이 아니라 physical circuit이다.
Serial 통신 : bit 단위의 데이터 통신, Tx, Rx 선으로 구분하며 하나의 선에서만 데이터를 전송
Baud-rate: 데이터 전송 속도, 단위는 BPR(Bits/sec)을 사용함.
연결된 두개의 Chip의 Baud-rate가 같아야 데이터를 올바르게 수신
UART의 장점은 2개의 line만 사용한다는 것이다.
SPI와 달리 P2P 통신이다.
UART는 Parallel data를 받아 Serial로 다른 디바이스에 전송하고 그 디바이스는 Serial data를 전송받아 Parallel data를 다시 출력한다.
Packet단위로 통신하기 때문에, 다음과 같은 추가 bit가 필요하다.
- Start bit
- parity bit
- Stop bits
 데이터 전송패킷의 형태는 정해져있다.
Start bit: 1bit / Data bits: 5 to 9 bits / Parity bit: 0 to 1 bit / Stop bits: 1 to 2 bits
- Overall procedure
Start bit는 전송되지 않고 있을때 주로 high voltage로 유지된다. 그러다가 high-to-low transition이 start bit에 감지되면 UART는 data bits를 baud rate마다 한개씩 전송받는다. 일반적으로 LSB부터 전송받는다.
추가 Verilog HDL 문법
-
Parameter: 상수를 사용할 때 쓴다. 이를 통해 모듈을 특정 상수값을 사용하게 인스턴스화 할 수 있다. 아래 코드를 통해 myLogicGate라는 모듈을 인스턴스화 할 수 있다. ``` module TopModule( input wire clk, input wire reset, output wire result );
LogicGate #( .WIDTH(8) // parameter 값 전달 ) myLogicGate ( .a(a_input), .b(b_input), .and_result(and_output), .or_result(or_output) );
endmodule
 - #10 clk = ~clk?
 Verilog HDL에서 #은 시뮬레이션의 단위시간을 의미한다. 따라서 해당 시간만큼 기다렸다가 동작을 실행하라는 뜻이다.
 다음과 같이 계속 수행하게할 수도 있다.
always #5 clk = ~clk ```
- repeat (숫자) (posedge sys_clk) system clock 이 posedge 숫자횟수만큼 반복할때가지 기다림.